
I’ve been doing this blog thing for over a year now, and while the main core of my posts are related to my love for beer culture, my most popular posts have been the two I wrote last summer about my hikes in Switzerland (here and here), which really had nothing to do with beer.

Just about every year I make a pilgrimage to the village of Lauterbrunnen in the heart of Switzerland’s Bernese Oberland, or better known as Jungfrau Region. For a bit more about my love for Lauterbrunnen, click here. When I am staying in Lauterbrunnen, I am pitching a tent at Camping Jungfrau. Next to my Beer & Bike rides, hiking is my favorite way of spending time in the outdoors. So why I wonder are those two posts my most popular? For sure one reason is because people aren’t Googling for bike ride ideas to beer-related sites. Beer & Bike is a very fringe.. but worthy! … topic. However, thousands of people travel every year to Switzerland to hike in the Alps. Furthermore, and I speak from experience, it is not easy to find complete information about specific hikes. When I am researching hikes, I am often still left with questions about whether it is dangerous, whether my normal hiking gear is enough, and how easy it is to get to and from the hike. Even someone like me, who is a reasonably experienced and fit hiker, can be scared off or become frustrated by the information I find on the internet. So I like to think that the aforementioned posts helped some people get a better idea about a couple of hikes. Pictures say a thousand words and that is a benefit that I hope I am bringing with these posts.

Three New Hikes in 2017
This past August, I did three more great hikes in the Lauterbrunnen area and what better way to help others get some benefit out of my experiences than to add new posts which I hope will find as much success as the previous ones. This post will start with the Eiger Trail.
Beforehand, let’s get some things straight about hiking in the Jungfrau Region. These tips are from the vantage point of a tourist visiting in the summer. They in no way dispute any advice or warnings given by any other website, but I am simply wanting to inform others how I wish to be informed. The overriding rule for any hike is “check the weather forecast“. That should always be at the center of any hiking plans.
Keys to Hiking the Jungfrau Region
You can get by with the tourist hiking maps.
The first thing you need to remember is this is not mountain climbing or forging your own path thru the mountains. This is hiking on a trail. Websites will tell you to buy a good topographical map, bring a compass, etc. If you’re the type of person who likes to venture off-trail, then ok. Look. Use common sense. Always check the weather forecasts. But don’t be scared off that you are going to get trapped in some way like the Uruguayan soccer team in the Andes mountains. Ok. A topographical map can be nice especially because it shows very realistically the characteristics of the trail. The one I bought was about 14 euros, so they are pricey like everything else in Switzerland. However the trails are very well marked and are clearly defined. Every intersection will show you exactly where you need to go. When there is a section which requires a bit of climbing or special equipment, this is clearly indicated on a tourist map. If you don’t want to do the climbing bit, you can still enjoy a great hike (as I will show in a future post).

You don’t need special equipment
Hiking is not meant for everyday shoes. I once saw a woman walking up the long, steep stone path of Mt. Vesuvius in high heels. Don’t do that. I have a pair of middle-of-the-road hiking shoes. My daughter wears running sneakers although I don’t encourage that, but she has done hikes up to 17km without any problem. I wear a pair of quick-dry pants which can be converted into shorts. Don’t wear cotton shirts. You will sweat and the cotton will just turn your shirt into a refrigerator. A quick dry shirt is invaluable. Then I usually have a rain-proof jacket that I can use if I am cold or if I want to keep my sweaty shirt from getting rained on. I would recommend socks with a little extra padding in them, but it is definitely not a requirement. For a 4-6 hour hike, I take a backpack with 2 liters of liquid and 4 protein bars. The rest is up to you. I usually take a phone battery charger and a small bottle of sunblock. I prefer using hiking poles. I think they save the legs a lot of wear and tear. But I see a lot of people of all ages not using them on these hikes that I will describe. You don’t need to go spend hundreds of euros on special hiking gear to do these hikes. You aren’t going to need rope, spikes, or a hard hat. If you need those things then you are not going to be following the trails in the basic tourist maps. And in that case, you don’t need my advice.
Physical fitness is important
All of the hikes I will describe are close to 16km (10 miles) long. Each of these trails is made up of shorter segments which allows you to customize your own fantastic hikes. I like to push myself towards the 16km mark. To me, that is the ideal day hike distance. You don’t have to be an athlete to do 16km. Just fit. In this region you have the benefit of taking advantage of cable cars, trains, and busses to take some of the difficulty away. These trails can be enjoyed in a variety of ways. Don’t be scared off.
Use a good hiking app
The perfect supplement to your paper map is an app on your smartphone which can be used as a map and a recording device for your route. The best one I have seen so far for hiking is Komoot. The hiking map in the app is topographical, contains the trails, and shows locations of other means of transportation to hikers such as cable cars and trains (I show an image in the Eiger Trail section).
Ok so without further ado, the real subject of this post…
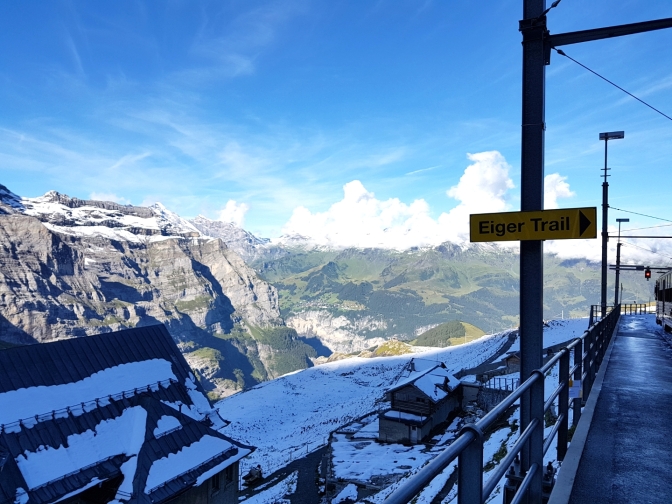
Eiger Trail
The Eiger Trail is a must-do because it gets you up close and personal to the north face of the Eiger. The easiest way to do this trail is to take a train to the Eigergletscher stop and start from there. From Eigergletscher it is mostly a gradual downhill hike with a couple of steep switchback sections at Alpiglen and the Grindelwald Gletscherschlucht. On the tourist map, the route is more or less what I have marked in green. Most people will end the hike at Alpiglen and catch the train. But I extended the hike to the Gletscherschlucht, had a meal at the Restaurant Marmorbruch and hiked to Grindelwald train station from there.

Here is the recorded route with the Komoot app.


Parameters:
- Starting Point: Eigergletscher Train Station
- My Ending Point: Grindelwald Train Station
- Recommended Ending Point: Pfingstegg Cable Car Station
- Eating Point: Restaurant Marmorbruch
- Distance: 14,1 km
- My time: 3:23
Hike Details
From the Eigergletscher station, it is necessary to cross over the tracks in order to start the hike, so take caution.
The initial part of the trail is still covered with some snow and the footing can be a little slippery. Here is really where you should be sure you have the right footwear. You might get by with sneakers on the rest of the trail, but here hiking shoes earn their keep.

The snowy stretch takes you to the Eiger North Face.
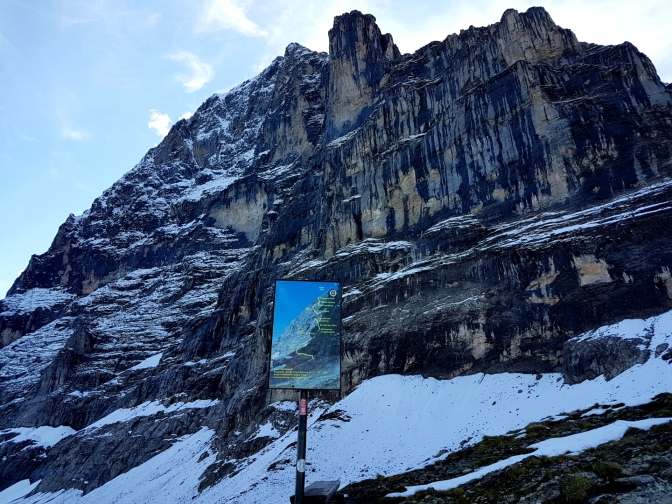
Beyond this point, the snow disappears and you reach the grazing meadows. When you are hiking trails in the Swiss Alps, you can never be surprised to have the way blocked by the Alps’ most adorable residents.

While they looked cute, the one blocking my way did not care much for my presence. Once I got around him, he proceeded to ‘push’ me down the path for the next hundred meters or so. But I think ultimately he was interested in getting into the sunlight just like me.

After the switchbacks down towards Alpiglen, you will reach the intersection where you can decide to end the hike or continue on towards the Gletscherschlucht. As you will notice, the signs indicate not only what is in each direction but the estimated time. The times are really based on a slow easy pace. A fit person can assume that it will take a shorter time.

The direction of the Gletscherschlucht heads below the tree line and has several forested sections.

The first glimpses of the glacier gorge called the Gletscherschlucht are breathtaking.

Now its a sharp hike down some switchbacks. But the payoff on the way down is an amazing look up the gorge.

At some point towards the bottom, you will have different options. I suggest going towards the Marmorbruch bridge. Crossing the bridge shows the dramatic crevasse carved away by the glacial stream.

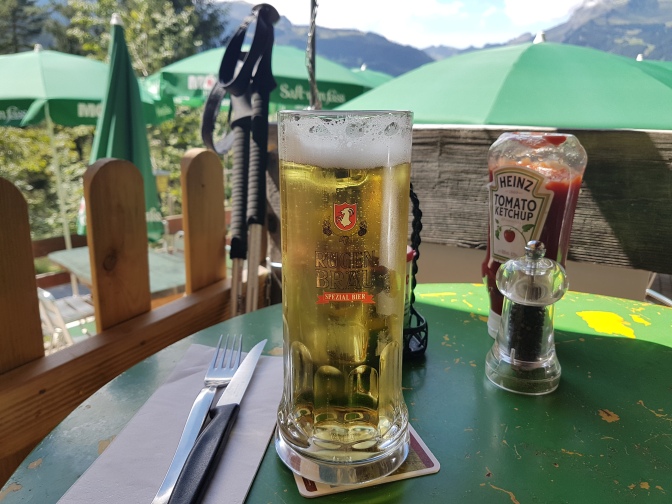
Since all of my protein bars had been consumed by this point, the Restaurant Marmorbruch was a welcome sight. Don’t expect a cheap meal in these Alpine hotel/restaurants. But at that moment, I could care less. An expensive schnitzel and a beer were priceless.

From Restaurant Marmorbruch, I walked back to Grindelwald. This is one part of the hike I would suggest NOT to do. Next time, I would have done the short hike up to the Pfingstegg cable car station and then taken it down. At the base, there is a bus stop in an adjacent parking area where the bus takes you to the Grindelwald train station.
Conclusion
In my opinion, it was difficult to get a really good impression of this hike on some of the tourism-based websites. They give the impression that there is some element of danger. I assume it is referring to the snowy section near Eigergletscher but it is never made clear. Otherwise there are no areas which should make anyone nervous. I am sure off season, it can be more treacherous. But in the summer time, as long as you check the weather forecast, there is no reason that you shouldn’t be able to do this hike with everyday hiking clothes and a suitable amount of food and drink supplies. The views were typically amazing particularly at the Gletscherschlucht which gave me an idea for the second hike and subject of my next post, Schreckhornhutte.


Amazing pictures! Thank you for sharing 😁
LikeLiked by 1 person
I love this post because I am going in July and want to do this trail however all websites make it sound a tad “dangerous” and insist on hiking boots? But then I see pictures and it doesn’t seem dangerous at all? To me dangerous is if you can slip and fall off the path and die or seriously hurt yourself. May I ask in which month you visited because I am going in July and most likely there won’t be any snow so hopefully I can get by with sneakers? Thanks for your advise in advance!
LikeLiked by 1 person
Hello Tales of Two! Thank you very much for reading. It means a lot to me. I did this hike in July so as you can see in the photos, there is one section starting from Eigergletscher tram stop that can be covered in snow even in July. That is the only section where the footing can be touchy. But nowhere is it such that you will fall off a cliff with one wrong move. You could do it with sneakers but I’d imagine you’d need to navigate that section slowly to avoid slipping, not to mention getting your sneakers damp. The rest of the trail is very do-able in sneakers. This is of course referring to a non-rainy day. If I may say though that good hiking shoes are worth their weight in gold for these activities. Have fun in July and hope to see your own experiences in a blog post!
LikeLike
Lucky man!!!! And may I add “Brave”. Breathtaking views.
LikeLiked by 1 person